Through the ProductIP platform, your customer can request that you create and share a technical file for one or more products. This feature helps suppliers demonstrate product compliance efficiently and ensures all required documentation is shared securely.
Feature access
You need an active ProductIP account and the option to purchase credits.
If your customer has covered the technical file creation cost, the request will be marked Prepaid. 
Before you begin
- Ensure you are registered with the email address on which the technical file request message was received.
- Ensure your ProductIP account is linked to your company domain, the company's admin must approve new users before they can access technical file requests.
Video instructions
Prefer to watch instead? A short step-by-step guide will follow soon!
Steps
1. Receive the request by email.
2. Click the login link to go to the Requests tab > Technical file requests.
3. Accept or Decline the request. For more info on these first 3 steps see our training resource View a technical file request.
After you accept the request you have 3 options:
- Create a new technical file
- Re-share an existing technical file
- Clone and share an existing technical file
4. Consider if your existing technical file is for the same product, same supplier and same regions. Only the market release date is different.
- NO: Click Create to start the Technical file wizard. For more information see Create a technical file.
- YES: Follow next steps.
5. Go to the Technical files tab.
6. Click the button Select columns in the right top corner to select "Reorder expiry".
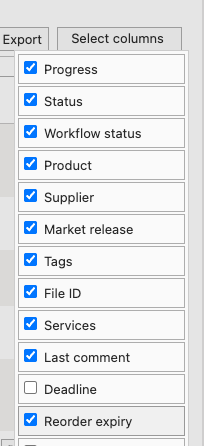
The re-order expiry date is now visible in your overview
7. Search for your related technical file via the Find field.
8. Navigate to the Reorder expiry column.
- DATE IS BLACK: Requirement list is still up to date. You can re-share the technical file.
- Go to the Requests tab > Technical file requests.
- Click the Share button in the related request.
- Select View & Clone.
- Add a comment for your customer explaining why you are sharing the existing technical file without changing the old market release date.
- Click Next.
- Click Skip&Share to copy the information from your customers' request.
Note: Don't use the Add share button under the Sharing tab in the existing technical file, because this has no link to the request from your customer.
- DATE IS RED: New requirements need to be added to the list and/or uploaded documents are expired. You need to clone, update and share the technical file.
- Click on the red date to see an overview of the needed changes.
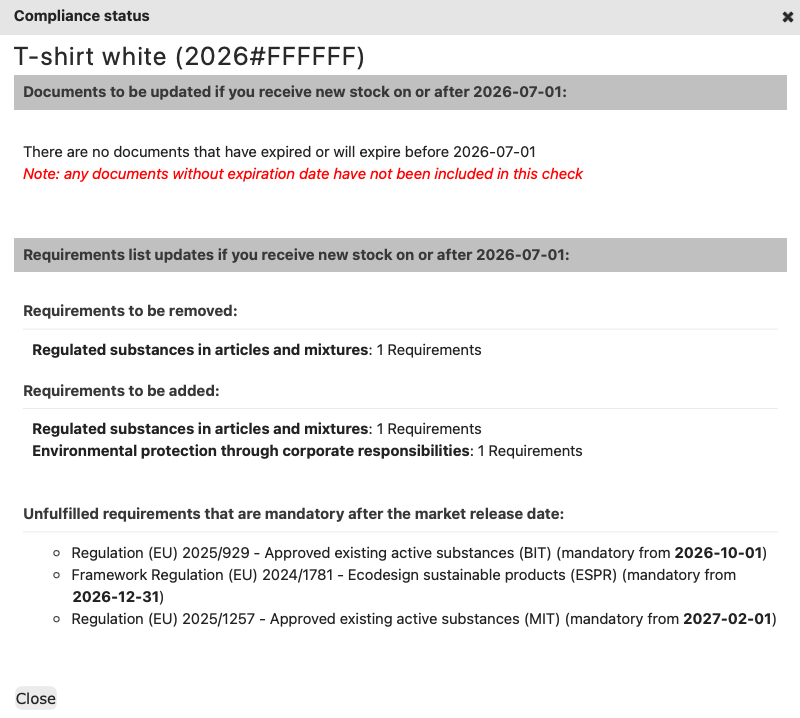 Note: Cloning a technical file with a new market release date costs 2 credits. Cloning is not available for prepaid technical file requests.
 - Click on the hamburger menu icon in the technical file row. A window pops up.
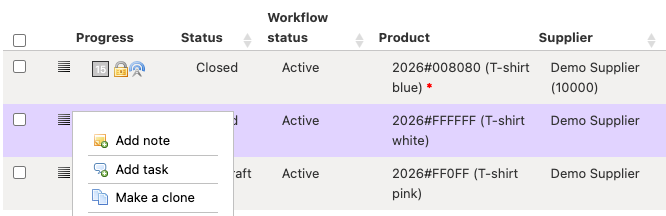
- Select Make a clone.
- Adjust the market release date to the new date in the technical file request of your customer.
- Click Create Clone.
- Note: A new technical file is created with an updated requirements list. All documents uploaded and linked in the old technical file are also cloned and linked in the new technical file.
- Open the new technical file and navigate to the Requirements tab to see which requirements are unfulfilled.
- Upload and link the needed documents.
- Go to the Requests tab > Technical file requests.
- Click the Share button in the related request.
- Select View & Clone.
- Click Next.
- Click Skip&Share to copy the information from your customers' request.
Note: Don't use the Add share button under the Sharing tab in the existing technical file, because it is not linked to your customer's request.
Once shared, the request will disappear from your Technical file requests tab. If your customer declines the technical file, please see step 5 in View a technical file request for further details.
Tips and Best Practices
- Use “View & Clone” sharing to ensure your customer can manage the technical file independently. This allows your customer to make a copy and store it in their account. If you select “View Only”, the customer can view but not copy or download documents.
- You can share your technical file even when it has not been finalised yet. Once you share your technical file, your customer will have access to the shared documents and can review them and create issues. If you resolve these issues or upload new documents, your customer can see the updates in real time.
When your customer declines the shared technical file or accepts and clones it, the link between the technical file request and the technical file is broken. Any further updates will no longer be visible to the other party.
- Keep clear communication with your customer if article details or materials differ.
- If multiple requests refer to the same product, ask your customer to merge them before proceeding.
- Do not use the Add share button under the technical file’s “Sharing” tab for the initial sharing of your technical file. Doing so will break the link between your customer’s request and your shared technical file.
- If differences appear between the technical file and the request, ProductIP will display a comparison screen. You can adjust the data or share it as-is.
Troubleshooting
- “Create” not selectable?
If you see a red banner, upgrade your account to a Corporate Account (free upgrade).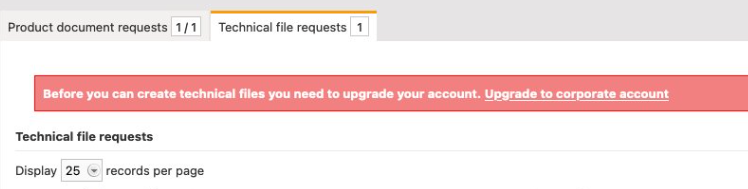
- Technical file request not visible?
You might not see the request for several reasons:
Scenario 1: Email mismatch
If your account shows no requests or technical files, the request was sent to a different email.
Solution:
- Ask your customer to resend the request using the correct email address.
- Or add the email address that received the request as a user in your ProductIP account.
Scenario 2: Account with your domain already exists
If you see a message stating that your domain already has an account, your registration is pending admin approval.
Solution: Wait for your company admin to approve your access. The admin receives an automatic email.
Scenario 3: Missing Technical File Request tab
If you can’t see the Technical File Request tab at all, your customer likely used the wrong email address.
Solution: Ask your customer to update the email address and resend the request, or ask your admin can add the correct user.
Related articles
Was this article helpful?
That’s Great!
Thank you for your feedback
Sorry! We couldn't be helpful
Thank you for your feedback
Feedback sent
We appreciate your effort and will try to fix the article