You have received an email from your customer through the ProductIP platform. Your customer uses ProductIP to manage product compliance and complete technical documentation. You are requested to upload test reports, certificates and other documents as evidence that your product complies with the European and national requirements. This step-by-step guide will help you complete the request in ProductIP.
Using ProductIP to upload documents is free of charge.
Feature access
This feature is available for all users and plans.
Before you begin
- Ensure the document request invitation email has been sent to your email address and that you have access to the ProductIP platform.
- Ensure your requested documents are in the supported formats: PDF, PNG, JPG (convert DOC/XLS to PDF first).
Video instructions
Prefer to watch instead? A short step-by-step guide will follow soon!
Steps
A short overview of the flow:
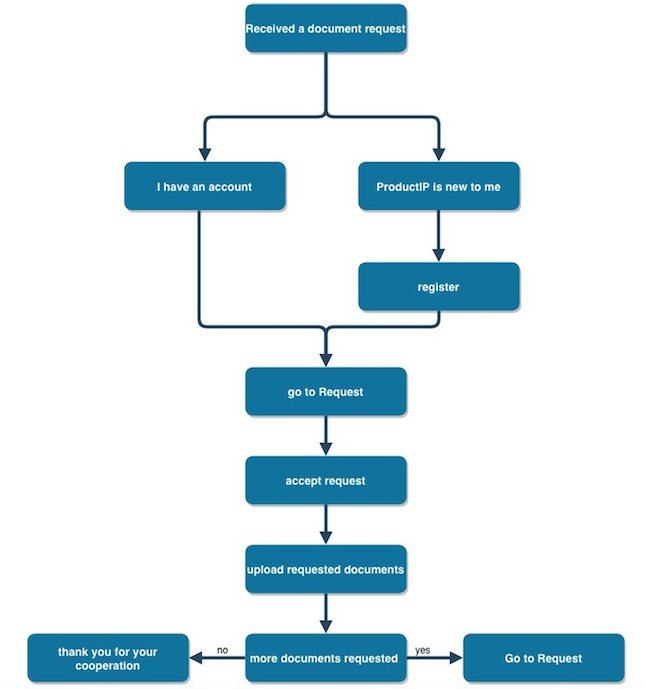
- Click the START UPLOADING button in the document request email.
- You will be automatically redirected to the registration or login page based on your email address.
Registration for new users
- Your email address becomes your username, which is entered by default and should be the same as the email address to which your customer sent the invitation.
- Fill in the required (*) fields.
- Create and confirm your password.
- Accept the general conditions and privacy statement.
- Click Register.
3. Log in to ProductIP platform using the same email address to which the invitation email was send.
4. Go to the Requests tab and select Product document requests, if not already selected.
5. Find the related request under Open requests and click View request.
6. A window will pop up requesting you to review the information in the request. Click Confirm if the information is correct. Click Decline if you want to decline the request. Fill in the Reason in the field and click Send.
7. A new window for the requested documents will pop up after clicking Confirm.
8. Click Upload documents. Supported formats are PDF, PNG, JPG (convert DOC/XLS to PDF first).
9. Communicate with your customer through the platform using the Comments field. Your customer can view and review your uploaded documents directly. If they have Comments or Documents remarks, you can also immediately see these in the document request.
10. Click Save & Continue later if you want to continue uploading documents later (your request will stay in the section Open requests) or Save & Close if you have uploaded all documents (your request will move to the section Open requests pending for review).
An example overview of requested documents:

Explanation:
Market Release Date and Factory Name: For easy reference the Market release date is visible on the overview. In case the product is manufactured from multiple factories, a technical file needs to be created for each factory location. If your customer is up-to-date on the location, they can add this information. This way it is clear for you and your customer to which factory this document request is related.
Product Information: Details about the product(s) related to this request.
Comments Section: Ask questions or communicate with your customer here. They will receive email notifications, and all messages are logged within the technical file.
Upload Button: Click to upload documents. You can also select documents you’ve previously uploaded to a technical file. If you’re only uploading new documents, this option doesn’t apply.
Customer-provided Information: Click to see additional details provided by your customer, such as market release date, regions, and product category. This information is used to generate the list of requested documents.
Documents to Upload: A list of requested documents. Hover over the blue “i” icon to see details about the related requirements. Click the blue square at the end to access resources, such as templates, to help you fulfil the request.
Status of Uploaded Documents: You can view the status of your uploaded documents after your customer has reviewed them along with their remarks explaining why documents were rejected or marked as pending.
Requirements tab: Get an overview of all requirements related to your document request. This may also include customer-specific information to help you fulfil the request according to their specifications.
Tips and best practices
- Do not reply to noreply@productip.com.
- Upload available documents as early as possible.
- Use clear filenames, provide comments for transparency, and use the templates in the resources if you are unsure.
- When you have completed the document request, click the Save & Close button. This notifies your customer and any colleague working with you on the platform that you have uploaded all available documents.
Troubleshooting
- Clicking “START UPLOADING” in the document request email doesn’t redirect to the registration page.
Try using a compatible browser like Firefox, Chrome, Edge, or Safari.
- I don’t see the document request on the platform.
Ask your customer if he has already sent the Document Request.
- I see the screen below after logging in to the platform:
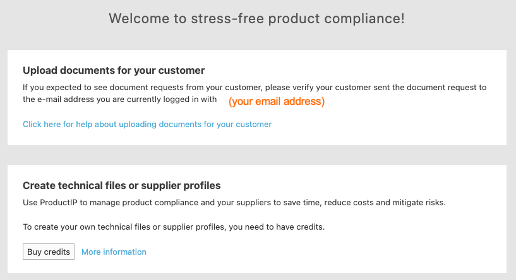
It means that the email for "Document Request" has not been sent directly to your email address.
Take one of the following actions:
- Ask your customer to send the document request invitation directly to your email address, or
- Ask the account admin to invite the colleague who has received the "Document Request" to register as a new user on ProductIP, so that all users can access the requests in the same account. This can only be done by the admin. Information can be found in How to invite users.
FAQ
- Can I upload documents later if some are missing?
Yes, you can upload documents in multiple steps. Only when the customer has closed the documents request, you are no longer able to upload document. - Why was my document rejected?
When hovering over the Status of your document, you will see the remarks from your customer explaining why the document was rejected. You can upload an revised document or use the comments section to ask questions or provide clarification. - Can I add colleagues to help with document uploads?
Yes. Adding colleagues ensures all relevant team members can see and handle requests. Information can be found in How to invite users. - What is the difference between Open request, Open request pending for review and completed requests?
- Open requests displays new and existing document requests with missing documents.
- Open requests pending for review have been reviewed by your customer and include document remarks. If there are still documents missing, your customer will notify you per email and the document requests will appear in ‘Open requests’
- Completed requests have been reviewed and closed by your customer. You can no longer upload documents but can click ‘View’ to view or download the uploaded documents.
Related articles
Was this article helpful?
That’s Great!
Thank you for your feedback
Sorry! We couldn't be helpful
Thank you for your feedback
Feedback sent
We appreciate your effort and will try to fix the article